
Getting started with Oculus Touch and Avatar SDK in Unity [Updated]
Welcome to 2017! I wish to you all that this will be an astonishing year!
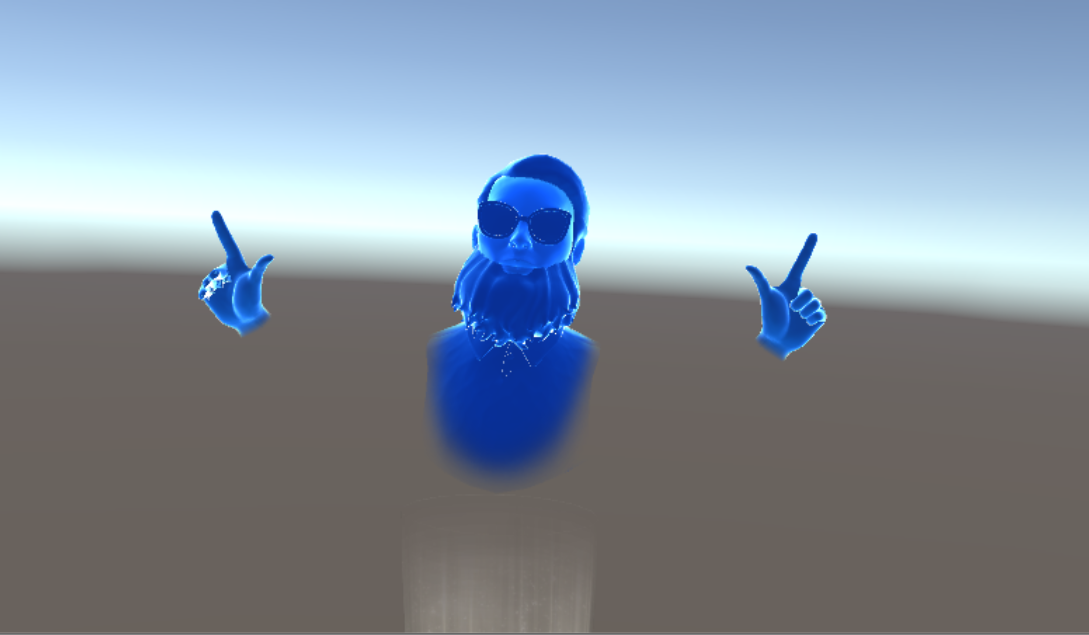
In 2016 I left you with this video showcasing my first experiments with Oculus Touch, Avatar SDK, in cooperation with our ImmotionRoom full body system. As you can see in the video, there are female full body avatars made with ImmotionRoom (so, basically, made using a Microsoft Kinect) and epic-bearded blue avatars made using Oculus Avatar SDK. Then there is some firing, because firing in VR is always cool!
This demo took me more time than expected, due to some problems I had in using the Avatar SDK. That’s why I’m writing this article: to help you in developing using this SDK wasting less time than me. It will not be a step-by-step tutorial, but I’ll give you some detailed hints. So, ready… go!
[Note: this is un updated version of the original article, that takes in count evolutions of the Oculus SDK… so if you’re returning here after a long time and you notice some differences, well, it’s perfectly normal]
Oculus Integration download
To develop for Oculus platform inside Unity you have to download the Oculus Unity plugins. The following tutorial makes you download all the following packages that are necessary to make Oculus Touch and Oculus Avatar to work properly:
- Oculus Utilities for Unity 5
- Oculus Avatar SDK
- Oculus Platform SDK
Recently has been released by Facebook an overall package including all these libraries in a single comfortable place that you can download from the Unity Asset Store. Just import Oculus Integration package into your project and voilà, you have all dependencies you need out of the box.
The upcoming instructions won’t use this facility and will make you download every single package separately for an educational purpose. My personal advice is to follow the tutorial as-is to learn how things work and then use the overall Oculus Integration in all your future projects.
Oculus Touch integration
Oculus Touch integration took me no time. Really, it already works out of the box and this is amazing. Just open your Unity project, import the Oculus Utilities for Unity 5 (you can find them here), remove the Main Camera gameobject, drag and drop inside your scene an OVRCameraRig or OVRPlayerController and that’s it! When you run the game, you will just see standard virtual reality without Oculus Touch and so you will think that I’m completely insane, but trust me… you have already Touch Integration!
If you look OVRCameraRig prefab better, you will see that its grandchildren LeftHandAnchor and RightHandAnchor already move according to your Oculus Touch pose. So, for example, if you attach a sphere to your LeftHandAnchor transform, that sphere will follow exactly your left hand, as you can see here:

If when you press play you can’t see your app to run properly in VR, it is because latest version of Oculus Utilities often doesn’t check the Virtual Reality Supported flag. So go to Edit -> Project Settings -> Player and make sure that the “Virtual Reality Supported” flag is checked and that Oculus SDK has been selected.
Ok, now you have Oculus Touch reference frame, but… how about input? Super easy, you use the OVRInput class. OVRInput class is very simple and easy to use and it is also very well documented at this link: I strongly advice you to read the docs! (RTFM is always the right advice, you know) Basically all you have to do is to query OVRInput about the status of some Touch triggers or thumbsticks and then do some action. In the above video, at 0:07 I move the avatars using Touch thumbsticks. Underlying code is super-easy: I attached a script to the avatar specifying this:
void Update ()
{
    Vector2 touchAxis = OVRInput.Get(OVRInput.Axis2D.PrimaryThumbstick) * Time.deltaTime;
    transform.position += new Vector3(touchAxis.x, 0, touchAxis.y);
}
Basically, I ask OVRInput about the status of the primary thumbstick (that is, the left Touch thumbstick) and move avatar object accordingly.
How about the Kalashnikov? Easy as well: first of all, I’ve attached it to the RightHandAnchor transform, so that it appears in the right hand. Then, in its update function, I’ve written:
if (OVRInput.Get(OVRInput.Button.SecondaryIndexTrigger) && m_deadTime <= 0)
{
    GameObject bullet = Instantiate<GameObject>(Bullet);
    GameObject fireStart = transform.FindChild("FireStart").gameObject;
    bullet.transform.position = fireStart.transform.position;
    bullet.transform.rotation *= fireStart.transform.rotation;
    bullet.GetComponent<Rigidbody>().AddForce(fireStart.transform.right*2.85f, ForceMode.Impulse);
    GetComponent<AudioSource>().Play();
    m_deadTime = DeadTime;
}
Here Seconday Index Trigger is the trigger that I push with my right hand index… like if I were firing. If I push it, I just fire a bullet and play a firing sound. It sounds amazing. Nothing difficult, nothing worth giving particular advices.

The problem if you use Touch this way is that you have no haptic feedback and no avateering… so bad!
Adding haptics
Oculus Touch can give you little vibrations to simulate haptics of the objects you’re interacting with. Again, this is a simple-to-use feature and it is well documented here. Only two things got me a bit confused:
- There’s no haptic prefab, nor MonoBehaviour script;
- Haptics uses audio clips. Yes, you’ve read right: you provide haptic engine with audio clips that it “plays” through the vibrations of your Touch controllers.
You can’t see that in the video, but I added vibrations to right Touch controller when the user fires with the Kalashnikov, to give my little game a more badass effect. So, I modified my update block to add this feature.
if (OVRInput.Get(OVRInput.Button.SecondaryIndexTrigger) && m_deadTime <= 0)
{
    GameObject bullet = Instantiate<GameObject>(Bullet);
    GameObject fireStart = transform.FindChild("FireStart").gameObject;
    bullet.transform.position = fireStart.transform.position;
    bullet.transform.rotation *= fireStart.transform.rotation;
    bullet.GetComponent<Rigidbody>().AddForce(fireStart.transform.right*2.85f, ForceMode.Impulse);
    GetComponent<AudioSource>().Play();
    m_deadTime = DeadTime;

    OVRHaptics.Channels[1].Mix(new OVRHapticsClip(VibeClip));
}
Last line is what does the magic. I ask OVRHaptics to play something on Channel 1 (that is the one of right hand… Channel 0 represents left hand instead). The clip I ask to play is VibeClip (which is an AudioClip object, that I pass as parameter to the script), which I have to box into a OVRHapticsClip object to let it to be played through haptic engine (and yes, I know, instantiating a OVRHapticsClip at every call of the method is not very smart, but this is a simple toy program, so that’s ok). About the chosen method, I preferred Mix over Queue… why? If you ask OVRHaptics to Queue a new clip, it will finish playing last one and then will start with new one: in the case of a machine gun, this is not a smart choice, since every new bullet gets fired while the gun is still vibrating from last shot, so you want the engine to blend the new vibration with the current playing one and this is where the Mix method comes in.
How did I create the VibeClip object? Well, I took the audio file of the kalashnikov bullets, amplified a bit its volume and duration using Audacity and that’s it: it’s simply a WAV file. My advice is starting from an existing WAV file and then going trial and error using Audacity until you obtain the vibration you find optimal. It’s obvious that the file gets interpreted so that the device vibrates to mimic the waveform the file contains.
Adding avatar
Here is were things start having some problems. Avatar SDK is not built-in into Oculus Utilities and you have to download it separately. So, go back to Oculus download page and look for Avatar SDK, download it and unzip it. This project is not only Unity-oriented, so you have to look for Unity package inside the \Unity folder of the unzipped SDK. Import into your project the OvrAvatar.unityPackage package . Notice this may require some time to compile the avatar shaders: my Unity seemed freezed for some minutes, but actually it was just compiling the self-occlusion shader.
Importing Avatar SDK could prompt you a lot of errors due to some references missing. This is because you have also to download the Platform SDK. Oculus Platform SDK can be found on Oculus main download page. Download it, unzip it, then import into your project the Unity Platform plugin that you can find at \Unity\OculusPlatform.unityPackage. This should fix all the errors you may have in your console.
Importing the packages do not suffice to see your virtual hands. To see your avatar, you have to drag-and-drop into your project the Assets\OvrAvatar\Content\Prefabs\LocalAvatar prefab. Hit Play and move your Touch controllers… you should start seeing some hands moving someway. Great! You should also see an error about Oculus App Id, but we will deal with this later.
LocalAvatar’s OvrAvatar behaviour will show you lots of options: most important to me are:
- “StartWithControllers”: if you check this, the avatar will not show you bare hands, but hands with Touch controllers in them;
- “ShowFirstPerson”: select this if the avatar is the one of the player;
- “ShowThirdPerson”: check this if this is not the player’s avatar. With this option a simple avatar’s body and face will be shown.

Ok, now we have a great problem: our OVRCameraRig and Avatar are completely unrelated!!! This is the biggest WTF of Oculus SDK. Your avatar and your camera+touch reference frames are not related in any way.
To make it work, you can do as in the samples: set the same pose (position+rotation+scale) for OVRCameraRig and LocalAvatar game objects. Then in OVRManager script of OVRCameraRig select TrackingOriginType: Floor Level.

Re-run the samples… now you should see that your avatar actually has sense now and that avatar hands are exactly where they should be!!
But this is a Pirro’s victory: if you try to move your OVRCameraRig gameobject (to emulate the fact that the player is moving inside the game), the avatar remains fixed in place! This is a non-sense for me (IMHO if I say that an avatar is a first-person-avatar, it should follow the CameraRig automatically) and I think that it is something that Oculus has to fix. And then, again, if you select Eye Level as origin type, nothing works the same.
You can solve the issues putting a common parent between the Rig and the Avatar, but I prefer having a more complete approach (also because this is needed in our ImmotionRoom prefab!). Solution I found to make them related in any case (indepently by the parents of both objects and the origin type) is writing a small script that makes sure that the avatar follows your position and rotation.
using UnityEngine;

public class AvatarCalibrator : MonoBehaviour {

    public GameObject LeftHand;
    public GameObject LeftHandAvatar;

    // Use this for initialization
    void Start ()
    {
        if(LeftHand == null)
            LeftHand = GameObject.Find("LeftHandAnchor");

        if(LeftHandAvatar == null)
            LeftHandAvatar = transform.FindChild("hand_left").gameObject;
    }

    // Update is called once per frame
    void Update ()
    {
        transform.position += LeftHand.transform.position - LeftHandAvatar.transform.position;
    }
}
Take this script, save it as AvatarCalibrator.cs and attach it to your LocalAvatar gameobject. This is a super-simple script that I wrote in few minutes and it is far from optimal, but it conveys the idea: the avatar will always make sure that his left hand coincides with the left hand reference frame of OVRCameraRig, this way it will follow you and will work like a charm even if you use a OVRPlayerController.
Try substituting the OVRCameraRig with a OVRPlayerController (and adding a floor plane, or the player controller will fall to death forever) : you will see that even if you move with your Touch Thumbsticks, your avatar will always follow you… awesome!

This scripts makes only the position equal and so it breaks the magic when you rotate the player. To make it work even to handle rotation, you have to add a line to take that in count:
using UnityEngine;

public class AvatarCalibrator : MonoBehaviour {

    public GameObject LeftHand;
    public GameObject LeftHandAvatar;

    // Use this for initialization
    void Start ()
    {
        if(LeftHand == null)
            LeftHand = GameObject.Find("LeftHandAnchor");

        if(LeftHandAvatar == null)
            LeftHandAvatar = transform.FindChild("hand_left").gameObject;
    }

    // Update is called once per frame
    void Update ()
    {
        transform.position += LeftHand.transform.position - LeftHandAvatar.transform.position;
        transform.rotation = LeftHand.transform.root.rotation;
    }
}
Then you have to go to your OVRPlayerController gameobject and remove the “Hmd Rotates Y” flag from the OVRPlayerController behaviour. Try to play again and to rotate your player controller and your head… wow! Hands now are always perfect!
Ok, time for a build… save the scene and build the executables (it may be a long process the first time you do it, but don’t worry)… launch the project… and…e-ehm, WHERE ARE MY HANDS???
Well, there is a problem. If you try looking at the program log, you will see a bazillion of exceptions, all like this one:
DllNotFoundException: libovravatar
  at (wrapper managed-to-native) Oculus.Avatar.CAPI:ovrAvatarMessage_Pop ()
  at OvrAvatarSDKManager.Update () [0x00000] in <filename unknown>:0

(Filename:  Line: -1)
The problem is in the chosen architecture. Go to your Build Settings (File -> Build Settings…) and pick x86_64 Architecture. I’m running a 64-bit Windows 10 PC, but building for x86 with Oculus had not given me any problem until now that I started using Oculus Avatars… weird!

Ok, so re-build and re-launch the program! You should finally see your hands!!
Anyway, if you want more info, full docs of Avatar SDK are here.
Adding YOUR avatar
So, everything seems fine, but you can still see only that bald aqua-coloured guy avatar and unless you are the Brazzers bald man, this can’t satisfy you: you’ve spent hours crafting an epic avatar of yourself and you wanna see your personal avatar. So, how can you do this? Again, this will not be super-easy.
Oculus documentation gives us precise instructions at this link (where there is a more precise explanation of Unity Avatar Plugin), but why reading the official tutorial? Keep reading here and I’ll warmly guide you 🙂
Select your LocalAvatar gameobject and double click on OvrAvatar script to modify it. Only thing you have to do is
Find the lines:
OvrAvatarSDKManager.Instance.RequestAvatarSpecification(oculusUserID, this.AvatarSpecificationCallback);

Replace oculusUserID with a valid Oculus User ID such as 295109307540267.
Done it? (If you are in doubt which number to use, use the provided one, we’ll return on this later on)
Ok, now, do you remember that little exception I told you to ignore? Well, it’s time to consider it. You have to provide Avatar SDK and Platform SDK your Oculus App Id (this is for security reasons). Go to your Oculus Developer Dashboard and create a new fake app, giving it the name you prefer (I chose TouchTest, since I have a lot of fantasy).

Go to details of your newly created app and choose the “Getting Started API” tab: you should see an App ID. Copy it.

Go back to Unity and select Oculus Avatars -> Edit Configuration and then paste your ID into the Oculus Rift App Id textbox that you see in the inspector.

Now select Oculus Platform -> Edit Settings and paste the same Id to the Oculus Rift App Id and Gear VR App Id fields. Now when you hit play you should not see the exception anymore. But, even more: you can see a new avatar, a black-with-blue-sparkles one! This is the avatar of user 295109307540267, that I have no idea who is… maybe Palmer Luckey? (Don’t know… there are no flip flops in the avatar… can’t understand if he’s really Palmer)
We’re almost there: we have shown the avatar of Palmer Luckey… but, what about showing yours? It’s so simple! You have to put your Oculus User ID inside that method instead of the one of Palmer. But… WHAT THE HECK IS YOUR OCULUS USER ID??
Long story short: I don’t know… looking on Google I didn’t find anything… I tried looking on my Oculus user profile, Oculus dev profile… and no clue about my ID! So, how to find your Oculus Id? Honestly, I don’t know.
BUT I can tell you a workaround to obtain it. I found this amazing video of Unity where they explain properly how to use Avatar SDK.
It’s awesome and at 21:50 they show you something really useful, that is the proper way to use OvrAvatar to show the user’s avatar. I’ve taken a screenshot for you

Basically, you have to create a script to initialize Oculus Platform with your App Id, then wait for platform initialization and only at that point you can create and initialize your avatar, providing it the ID of the logged in user (that is, you). I used this to trick the system and obtain your User Id.
So, create a new script called PlatformIdManager and add it to an empty gameobject.
using Oculus.Platform;
using Oculus.Platform.Models;
using UnityEngine;

public class PlatformIdManager : MonoBehaviour
{

    // Use this for initialization
    void Start()
    {
        Core.Initialize("<your_oculus_app_id>");
        Users.GetLoggedInUser().OnComplete(OnGetUser);
    }

    private void OnGetUser(Message<User> message)
    {
        var id = message.Data.ID;
        Debug.Log("My id is " + id);
    }

}
Of course you have to replace <your_oculus_app_id> with your Oculus App Id. Launch the program hitting Play and… bam! Error! Why is that happening? Reason is that Unity can’t connect to your Oculus platform to detect who is the logged-in user. We have to make them communicate.
Let’s get back to your developer dashboard and scroll down the window: below your App Id that you used above, you should find a “User Token” section. Click on “Generate Token” and copy all that strange string that the portal generates for you.

Then go back to Unity and select Oculus Platform -> EditSettings. In the Inspector window, expand “Unity Editor Settings”. Select “Use User Token” and paste your user token into “Oculus User Token” textbox.

Now save everything and hit play! You should see in the Unity console your Oculus User ID being written! Copy it and replace the standard Palmer Luckey’s number with this number inside OvrAvatar.cs script.. re-launch everything (you can even remove the PlatformIdManager script, now!) and now you should see your avatar being used! You can even add a new Local Avatar with “Show Third Person” flag checked to see your own face!
Two more things about this last point:
- You will get a warning about Clobbering of ID, because in the PlatformManager script you should not write Core.Initialize and specify again the App ID (that you’ve already specified in Unity menus), but if you don’t do it, you get a null reference exception (don’t know why, another strange issue). To cancel the warning, you can go back to Oculus Platform -> Edit Settings and clear the Oculus Rift App Id and Gear VR App Id you wrote some time ago. Anyway, the warning is of no harm, so you can even leave everything as is.
- As I’ve said, this is the quick-and-dirty way to obtain your avatar. Theoretically you should do as the video and the Oculus official documentation suggests, so to make sure that the avatar of the current user is shown in a clean way, whoever the user is (if you distribute your game with the above scripts, everyone will see YOUR avatar!). To do that, there is the issue that you have to wait for the Platform to initialize itself before showing the Avatar/Avatars. If you try to specify a user Id before the Platform has been initialized, nothing will work and you will see again the aqua bald guy avatar. One possibility to obtain this is deactivating the Avatar gameobjects and then modify the script PlatformIdManager as follows:
using UnityEngine;
using Oculus.Avatar;
using Oculus.Platform;
using Oculus.Platform.Models;
using System.Collections;

public class PlatformIdManager : MonoBehaviour {

    public OvrAvatar myAvatar;

    void Awake ()
    {
        Oculus.Platform.Core.Initialize();
        Oculus.Platform.Users.GetLoggedInUser().OnComplete(GetLoggedInUserCallback);
        Oculus.Platform.Request.RunCallbacks();  //avoids race condition with OvrAvatar.cs Start().
    }

    private void GetLoggedInUserCallback(Message<User> message)
    {
        if (!message.IsError) {
            myAvatar.oculusUserID = message.Data.ID;
        }
    }
}
And then set your Local Avatar as parameter of this script. This script will make everything wait until the platform has initialized with current user; then when the user will be recognized, the script will assign it the ID of the current logged in user (the player). Of course you have also to go back to the line you changed into OvrAvatar.cs and restore the line OvrAvatarSDKManager.Instance.RequestAvatarSpecification(oculusUserID, this.AvatarSpecificationCallback);
Launch everything again: you should see again your avatar… but the code is far better! So, why do I showed you the dirty approach? Because this way I could show you the hack to obtain your Oculus User ID and because knowing that can be useful in some situations.
And with this, my super-long tutorial (woah, it is the longest post ever on my blog!) ends. My final words on Avatar SDK is that it is cool but it still needs a bit of refactoring.
Hope you liked this tutorial, since I spent a lot of time writing it: please like it, ask questions about it, comment it saying that I’m amazing and share it with all your other fellow Virtual Reality devs! And if you want, come to say hello to all of us of Immotionar! Happy 2017!
Disclaimer: this blog contains advertisement and affiliate links to sustain itself. If you click on an affiliate link, I'll be very happy because I'll earn a small commission on your purchase. You can find my boring full disclosure here.

Awesome! Thanks for getting me started with Oculus Touch in Unity!
You’re welcome! Hope you will do the next top-selling VR game on Oculus store!
Not sure if Oculus Avatar SDK has already fixed the position issue. In my project, it seems if I make sure the position/rotation/scale are the same between CameraRig and LocalAvatar at the initialization. Then the avatar will always follow the cameraRig without writing any scripts.
Really? Thanks for the tip… I’ll check it out in the next days and I’ll let you know!
Hello Yunhan… I’ve tried what you say and no, it hasn’t changed anything. Maybe you don’t move your CameraRig in your project, that’s why you do not see any issue. If you try to move it, you will see that the Avatar remains at the same place.
Of course positional tracking works correctly in the setup you’re saying.
Anyway, thanks for the tip!
Sorry, it’s my mistake. I forgot that I put VRTK in my project and it automatically links the OVRCamera and OVRAvatar together.
Nevermind… thank you anyway for the contribution to my website 🙂
It might be an update, but I simply made the local avatar a child of the OVRCameraRig equal in level to TrackingSpace and it seems to carry along just fine and work perfectly, (so long as you don’t plan to rotate the OVRCameraRig which I can’t see many reasons for anyway.
Do you know of any mesh versions of the avatar body or how to extract them? I’m doing an NPC tutor character similar to how Oculus Medium does it.
I can capture the transforms and reapply them to the bone structure stripped of all the OVR stuff, but only can find actual meshes for hands in one of the example scenes. I could just do a stiff floating head, but I kinda want to keep the whole neck joint nuance that is built in.
If you make the avatar as child of the OVRCameraRig, then obviously they’ll move together.
About the other questions… I’m sorry, but I don’t know how to help you!
Thanks for the tutorial! You have a copy and paste error of some sort in the avatar section…
// Use this for initialization
void Start ()
{
if(LeftHand == null)
LeftHand = GameObject.Find(“LeftHandAnchor if(LeftHandAvatar == null)
LeftHandAvatar = transform.FindChild(“hand_left”).gameObject;
}
Hello, thanks for the tip!!… anyway I don’t get my error… I went to the code piece that you pointed me, but it seems ok to me…
Are we able to obtain a list of customized avatars?
You mean a list of preset-avatars’ public IDs? Mmmmh I don’t think so at the moment
do you know how to have specific hand grip pose for different objects. Like in the oculus touch space demo, where pressing trigger button while grabbing the gun has a different pose than while grabbing the soda cans or the floppy disks.
Uhm, honestly not… I’ve never experimented with custom hands poses. Have you tried following the sample on custom hand poses and see if there is a way to trick the system?
One crappy idea for a prototype could be to have different coherent avatars, where only one is enabled each time: the one with the pose you want to show.
If I’ll find some times, I’ll try to investigate…
Wouldn’t Oculus User ID be your Oculus user login name? just an idea? i haven’t tried it.
Well, I remember having tried everything and nothing worked until I did that trick. Maybe things have changed… you can try and then tell me the results!
Why do the Oculus Avatar shaders take so long to import into Unity?
Good question, but I have no idea! Surely, being transparent and with all that effects, they’re not “easy” shaders… but they take really an enormous amount of time…
Hello,
Awesome tutorial and everything worked well for me! Very simple to follow.
Would there happen to be a more precise script for the Local Avatar’s ‘AvatarCalibrator.cs’? Basically the right hand flies away and it does not look the most pleasing.
Any tips or guidance here would be greatly appreciated!
Thanks! Glad you liked it!
Why do you say that the right hand flies away? Can you explain that better? (It didn’t happen to me… so I want to know what do you mean, so that I can help you)
Thanks for responding. It seems like when I turn my head, the right hand is not attached to some anchor point like the left hand is, causing it to move with the camera, while the left hand stays in place thanks to the AvatarCalibrator script.
Uhm, very strange. I’m having issues with my PC, but when I’ll fix it, I’ll give a try. If I’ll be able to reproduce the issue, I’ll help you. If you have any basic Unity project with this issue, you can email it to me (via Wetransfer) at tonyvt AT immotionar DOT com
I get all kinds of weird errors when I try to import the oculus SDK assets, but no errors with the utilities… I have gotten it to work similar to how you were using spheres as children of the hands, but would love to have the actual hands in the VR space… did you have a long list of errors and if so how did you get rid of them?
I didn’t get errors… I should check it out, since they’ve updated the SDK… thanks for the tip!
Changing the build architecture to x64….life saver!
Ahahaha I’m happy that you spared some time thanks to this article!!
Thank you for trying, BUT: This was an awful waste of the time of anyone trying to learn….
If you don’t do some step by step there is no point. Anyone coming here for info, is here because they can’t just go to the ‘documentation’ BECAUSE IT TELLS YOU NOTHING, I know how to use the input manager,.. But when I go to ‘Input scripting’ Docs on Unity to get the simle names to input and axes to create etc,. I get this:
“Input class in UnityEngine Description Interface into the Input system.
Use this class to read the axes set up in the Input Manager, and to access multi-touch/accelerometer data on mobile devices. To read an axis use Input.GetAxis with one of the following default axes: “Horizontal” and “Vertical” are mapped to joystick, A, W, S, D and the arrow keys. “Mouse X” and “Mouse Y” are mapped to the mouse delta. “Fire1”, “Fire2” “Fire3” are mapped to Ctrl, Alt, Cmd keys and three mouse or joystick buttons. New input axes can be added in the Input Manager. If you are using input for any kind of movement behaviour use Input.GetAxis. It gives you smoothed and configurable input that can be mapped to keyboard, joystick or mouse. Use Input.GetButton for action like events only. Don’t use it for movement, Input.GetAxis will make the script code smaller and simpler. Note also that the Input flags are not reSet until “Update()”, so its suggested you make all the Input Calls in the Update Loop.”
THAT IS No HELP AT ALL WHATSOEVER IN THIS COSMOS!! HELLO!! That means nothing,,. tO SOMEONE LEARNING THAT IS JUST A FOREIGN LANGUAGE.. You could be actually helping by going into some basic detail for beginners.. And helping save an industry in the process..
“Use this class to read the axes set up in the Input Manager, ” WHAT???!?!?!
Thanks for your feedback… actually the article is aimed to someone that has a good knowledge of Unity, so I could skip some “standard” points and focus only on actual Oculus stuff. That’s why I don’t go deeper in these details. When I originally wrote the article, Oculus had no documentation for this Avatar SDK inside Unity, that’s why this article was very useful.
Thank you for posting this. I went through all the steps you posted the same way you did by searching for all the answers. I ended up getting stuck on the avatars not showing up in my builds. Months of searching the forums and waiting for oculus staff to respond to my messages and finally I find your post that gives the answer to the one thing I’m doing wrong. I didn’t switch x86 to x86-64. Now that I did I can finally start working with the avatar system. Thanks so much for writing everything out. It a great help!
You are welcome! I wrote this because I wanted to help other fellow developers like you.. I spent a lot of time in the very first days of Avatar SDK to understand how to make it work (it was poorly documented by Oculus). Happy coding!
Thanks for the great post! I’ve been wresting with the avatar sdk for a few days now and was hoping someone here could help out. I’ve done everything here bar one thing. The current version of the sdk no longer has the field for user tokens. Ive entered my own development account in the new area for test user email and password as without it I get the null reference exception. However, with these details entered in, the application just hangs and never spawns the avatar. Any ideas?
Actually, no. Maybe I should update this article again…
+1 for an updated article!! i have also been stuck on getting avatar and platform sdk working for a while 🙁
would be amazing if you could do a tutorial on how to get avatar + social + voice chat working!!
the social starter app that Oculus provides is supposed to help but the documentation is very poor. I even watched one of the tutorials from Oculus Connect but it skips over all the Unity steps and just shows the end result..very frustrating.